Sunday, July 6, 2014

Minecraft: Hidden Doors


The first thing I tried to do when the game added sticky pistons was to make hidden doors.  There are lots of different ways to do this, but a number of them have little alcoves or other signs that a door is present.  You have to put a lot of thought into placing your door so that it can't be stumbled upon.  That lever is also a dead give away, but this is an emergency exit from the city so I don't mind giving away it's location.


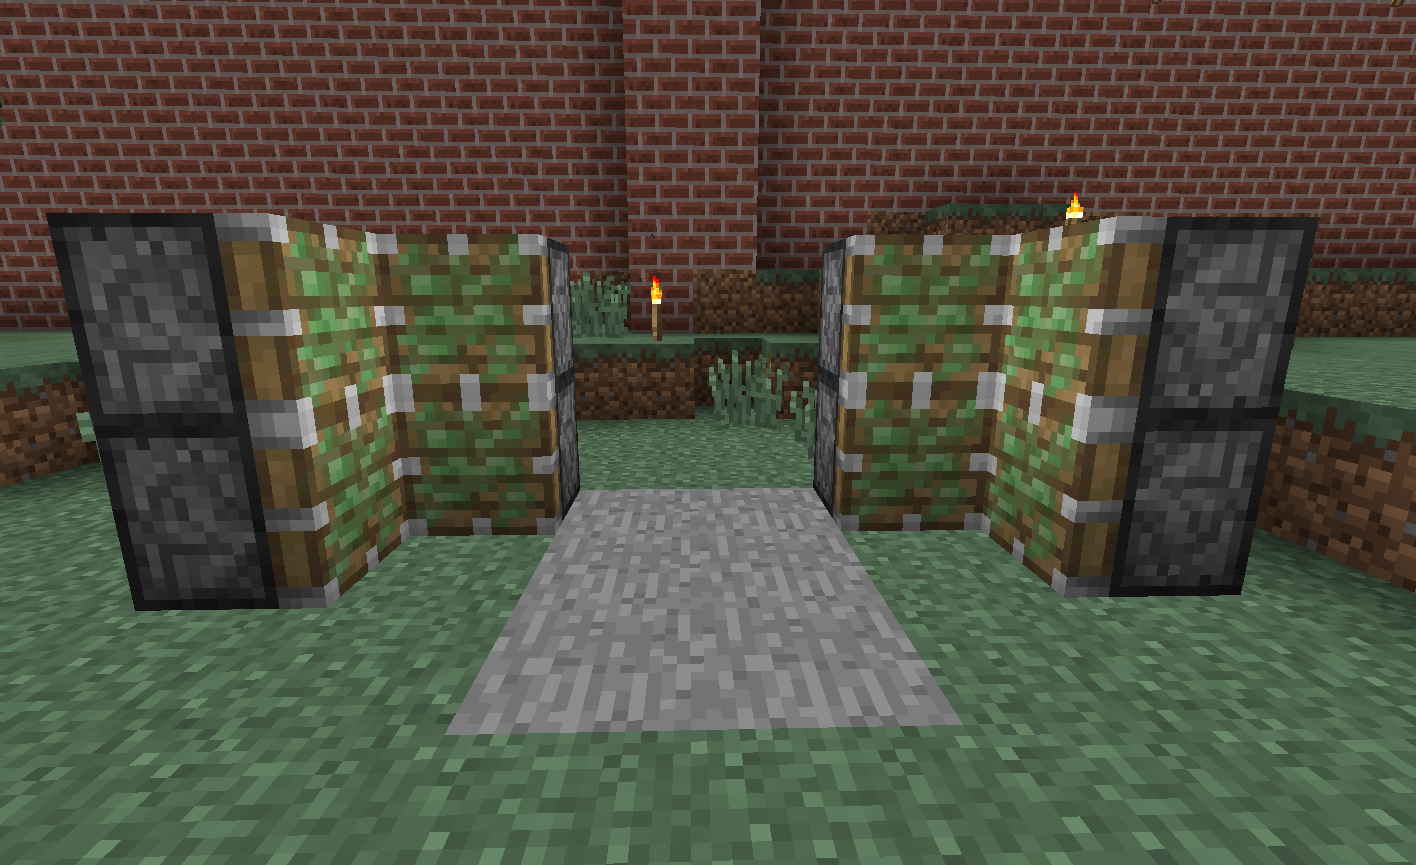
Start your doorway with a path 2 blocks wide and 3 blocks deep.


Put 2 stacks of  sticky pistons on each side, even with the back 2 rows of the path.  The sticky part should face inwards.  This is how they'll cover up your doorway, but open it when you flip the lever.


Your next stacks of pistons will face towards you, these will push the hidden face into place when the door is closed.


Then put the stone blocks that will make up the face of the door.


Place blocks on top of the piston stacks and across the door opening.  This will run your red stone properly


Redstone dust across the top, with repeaters facing outward.  When powered, the power will actually flow down through the stack and power both pistons. You should try an experiment and make the door three blocks high and see if it will still power the whole stack...


If you put a lever in the center, this will allow you to turn on the circuit.  Hopefully powering the pistons.


Sure enough, it totally worked!  Way to go you have a hidden door! Go turn off the lever.


Oh no!!!  It looks like your secret door is busted.  It isn't really, we just need to figure out what went wrong.  I think you'll find that there needs to be a delay before the pistons on the side fire off, so they can pull your other pistons and stone blocks outward, revealing your opening.


That is the whole reason we put those repeaters in our circuit.  If you'll remember, the repeaters not only refresh the power of a circuit but also can input some delays into the circuit.  This is the delay you need.  Click the repeaters three times each and you'll get the delay you need to have everything work properly.


Flip the switch on and off again a couple times, and you'll see that your doorway is 100% functional.


A switch inside the door is only good if you have another way in.  If you place a switch on the other side, this can power it as well and not lock you out of the hidden room.  However, if you do something as simple as what is pictured it is way too obvious.  People will flip the switch just based off curiosity.


You can also do a daylight sensor if you're crazy and just want the room open during the day.  


In the end though, you can do some pretty cool escape routes from your castles, towns, or mines.  Keep roving, Rovers.

Minecraft: The Daylight Sensor


Have you ever been yelled at for leaving a light on?  I know when I was a kid I used to get yelled at a lot.  It never made much sense until I started paying electricity bills.  If only there were a neat way to make sure things only turned on at night.   It turns out we have such a thing as our disposal:  the Daylight Sensor


That Brown and white tic-tac-toe board is the daylight sensor.  When daylight hits it, it will emit a signal as strong as the daylight it is being hit with.  Dawn and dusk it won't go very far, and at noon it will be at it's strongest

In this case I put an inverter right next to it.  This is because I want my house lights to be on when it is dark.  I ran the circuit into four red stone lamps.  These should keep the house well lit when it is dark, and light up this upper area as well.


Then I ran the circuit through a repeater and downstairs.  Through another inverter along the way before hitting the iron door for the building.

Now we have a building that automatically unlocks during the daytime, and locks itself as soon as the sun goes down.  You have to keep those creepers and skeletons out of your nicely furnished home.


These are super simple approaches that merely illustrate a couple of different ways a daylight sensor can work.  The most important bit to remember is that you can leave it as is if you want it to provide power during the day.  Or you can run it into an inverter and have it power something when it is dark.

What it powers is largely up to you.

Sunday, June 29, 2014

Minecraft: Auto Harvesting Field


Rovers, welcome once again.  I want to speak a bit on the subject of food.  If you play survival mode you will find that food is integral to your success.  If you keep yourself full on food, your health with regenerate after a fall or a fight.

If you band together with other players on a multiplayer server, you'll all need food.  You don't want to have to sit around tending a farm all the time.  You don't want to spend time harvesting entire fields.  You want the final product so you can make some food.  Then you can keep roving!

It is all about the roving.


It all starts with a field 8x8 or smaller.  I usually go with an 8x8 lot because it takes an entire stack of seeds to plant and usually produces a full stack of wheat every harvest.

You then cut a channel down both sides and fill it with water.  I then cover the irrigation ditches with half slabs so that you can walk gently into the field.  Jumping will break wheat and un-till the ground beneath it.

You need an 8x8 or smaller field because the water will only irrigate 4 blocks away.


You then build enough pistons to reach across.  Above the pistons, build a reservoir to hold some water.  When the pistons are extended, they will hold the water up.  You can see the red stone circuit that will activate the pistons.  In this circuit you want that redstone to be active, flipping a lever should turn it off starting the water works.

The water will carry your harvest down to the from of the plot.


At the front of the plot, you need another channel.  This will have water flowing down from the irrigation ditches.  Somewhere in the middle break a path for the items to gather in.


This is what you want in that path.  A hopper feeding into a line of droppers. At the top of the droppers, place your chest.  Yet again, we need to feed this.red stone circuit so the droppers will feed the items up the tower.


To power the hoppers, just like with our furnace example, you'll want to build a clock circuit. Put two items in the hopper and watch for it to blink the circuit on and off rapidly.  If it doesn't, reclaim the items and put them in the other hopper.

You can then run this directly to the droppers and alternate block - redstone torch - block to bring the power up the line of droppers.


Or you can run the clock into a block, and run back a circuit from the level that powers the pistons.  then have the resulting power flow into the droppers.  This would turn the droppers on only when you have the water running.


If you feel that 8x8 isn't big enough you can place multiple farms in a row and flow the collected goods into a single chest using a line of hoppers.  Remember that pressing shift and clicking on the correct face of your target will direct the hopper's output correctly.


You can even have them all run off the same switch!


This is how the harvest works.


The only downside is you still have to manually plant the field.  Even rovers have to do a little work sometimes...


But the gains are truly worth it.

Saturday, June 28, 2014

Minecraft: Semi-Auto Furnace


Rovers, today I want to address the concept of the simple Furnace.  If you are like me, you enjoy roaming too much.  You don't want to sit around and baby a furnace, taking items out and putting them in.  Luckily, they've fixed some things by introducing hoppers!

If you check our my build here, you'll figure out how to build your own semi-automated furnace.  You can drop by and drop any coal or ore you may be carrying.  Go ahead and carry on with your roving, it will be taken care of automatically and be smelted or cooked upon your return.


The whole build starts with a furnace.  The way hoppers interface with a furnace is this.  If a hopper feeds into the side, it will go into the fuel slot.  If a hopper feeds into the top, it is the object being cooked or smelting.  If you put a hopper under the furnace, the finished product will be put into it.

Roving-tip: If you want a hopped to feed into something in particular you need to press shift and click on the side of the block you want the hopper to feed into. It will default to pushing things straight down if you don't do this.


So if you build a hopper system right, you can build your chests all in a row and label them so you know what to put into them.   I put the output into two hoppers that chain into a dropper.  Then I put more droppers in a line up into the chest.

This is where I personally hit a stumbling block.  How do I make the droppers work?  They need a red stone circuit to activate them.  You need to activate them all to get the item up to the chest.  It looks like we need a circuit to activate all those droppers.  (I left one dropped out of the stack so you could see the orientation of the hole it pushes out of)


This would be the solution for you.  It is a clock circuit.  Two hoppers repeatedly transfer an item back and forth, momentarily turning on a red stone circuit.  I only put two items in and it works forever.  The only problem was, it ran forever!  Endless clicking!

A rover needs to keep his sanity.


So my next move was rejiggering the circuit to incorporate a lever to turn on the droppers.   I flowed it into a single, solid block.  I ran the clock circuit into the same block.  The last part is to find a way to flow this power to all of the droppers.
 

This is the way you do that.  A red stone torch jutting out from the block with compare only allow the signal through when you flip the level. You then flow the redstone to a block next to the bottom hopper.  As high as you need to go you can flow by alternating redstone torches and blocks.


Here is the end result.  I built it all above ground to give you a chance to see all the moving parts.  if you want to bury it in the ground like in my first picture, you just need to put it all down in the ground 3 blocks so only the chests are visible.


The buried clock circuit.


 The buried hopper tower.
 

The final, buried result.  Only, know that to open the chests you'll need to break the blocks above the chests so they have the ability to open.  Or else you can't fill them.  I like to put half slabs above them to make it look a little cleaner.

Wednesday, June 25, 2014

Minecraft: Redstone Basics


The beauty of redstone! It is as simple as you want to make it, or as complex as you can dream.   Rovers, you can lay down a track of red stone but it will be useless by itself.  A dull, dark red line on the ground that does nothing exciting.  Don't let your red stone dust sit dull and lifeless upon the ground!

No, for redstone to come to life you need a source of power!  There are several sources of power you can take advantage of.


The lever.  This will turn a circuit on when you flip it down, and turn it off when you flip is back up.  It is very useful when you want your circuit to run on command. 


The redstone torch.   This is always on.  Mostly.  There are tricks you can use red stone torches in different ways.  We'll get into that later.


The simply button is a little different.  When you press it, it will turn a circuit on for a few moments before turning it off.  This is useful when you want a circuit to turn on quickly.
 

Pressure plates are cool too.  The wooden one will turn on when anything walks across it or is dropped on it.  It will power a circuit as long as it is pressed down upon.

  The stone pressure plate can only be turned on by something the weight of a player or a monster.  It will turn on as long as something is standing on the pressure plate.


All of these inputs will only power redstone up to 15 blocks away.  here you can see 16 blocks of red stone dust.  The final block in the bottom is dark, not powered.  So sad....it deserves to shine!!


This limit can be overcome with a simple object called a redstone repeater.  A repeater will expand the signal another 15 blocks, as shown here.


Before repeaters were added to the game, we had a hack for that.  Red stone torches.  If placed on the side of a block, they change the signal.  If it is on, they turn it off.  If it is off, they turn it on.  you can see two such blocks here in a circuit.  The function  just like a repeater, but you had to at least have two of them in a row (or else it would just turn the circuit off).

If you want to be seen as a bit old school (or you are short on materials) you can do this as well.


All of these inputs are useless if you have nothing to power. You can power doors, as shown.  Be warned, it may not open the door unless you remove the power source and then put it in again.


You can also power trap doors.  There are many other items you can power such as pistons, minecart tracks.  If you run powered red stone to many items, they will turn on.  Experiment, find out what the power does, and then experiment.  It is fun!

Remember switches?  And those repeater things?  Another thing repeaters do is DELAY a signal.  If you right click a repeater, the posts will move apart.  There are 4 clicks, each representing a longer delay.  If you put repeaters in a row, you can generate a significant delay.


A significant delay.


And if you attach it to a button, you can generate a long enough delay to make it through a trap door.  Time for you to go out and begin experimenting.